# Replace motors mechanism Smartb

<table border="1" id="bkmrk-czasami-co%C5%9B-si%C4%99-pops" style="border-collapse: collapse; width: 100%; border-width: 1px; border-style: hidden;"><colgroup><col style="width: 50%;"></col><col style="width: 50%;"></col></colgroup><tbody><tr><td style="border-width: 1px;">In this document you will find a description how to replace the throw flaps motors system in the Smartb

</td><td style="border-width: 1px;">You will need:

- a new set of motors mechanism
- a set of allen keys
- cross screwdriver

</td></tr></tbody></table>

<p class="callout danger">Before replacing disconnect device from the power supply!</p>

<p class="callout info">With practice, some points can be omitted, but the simplest path will be described here</p>

---

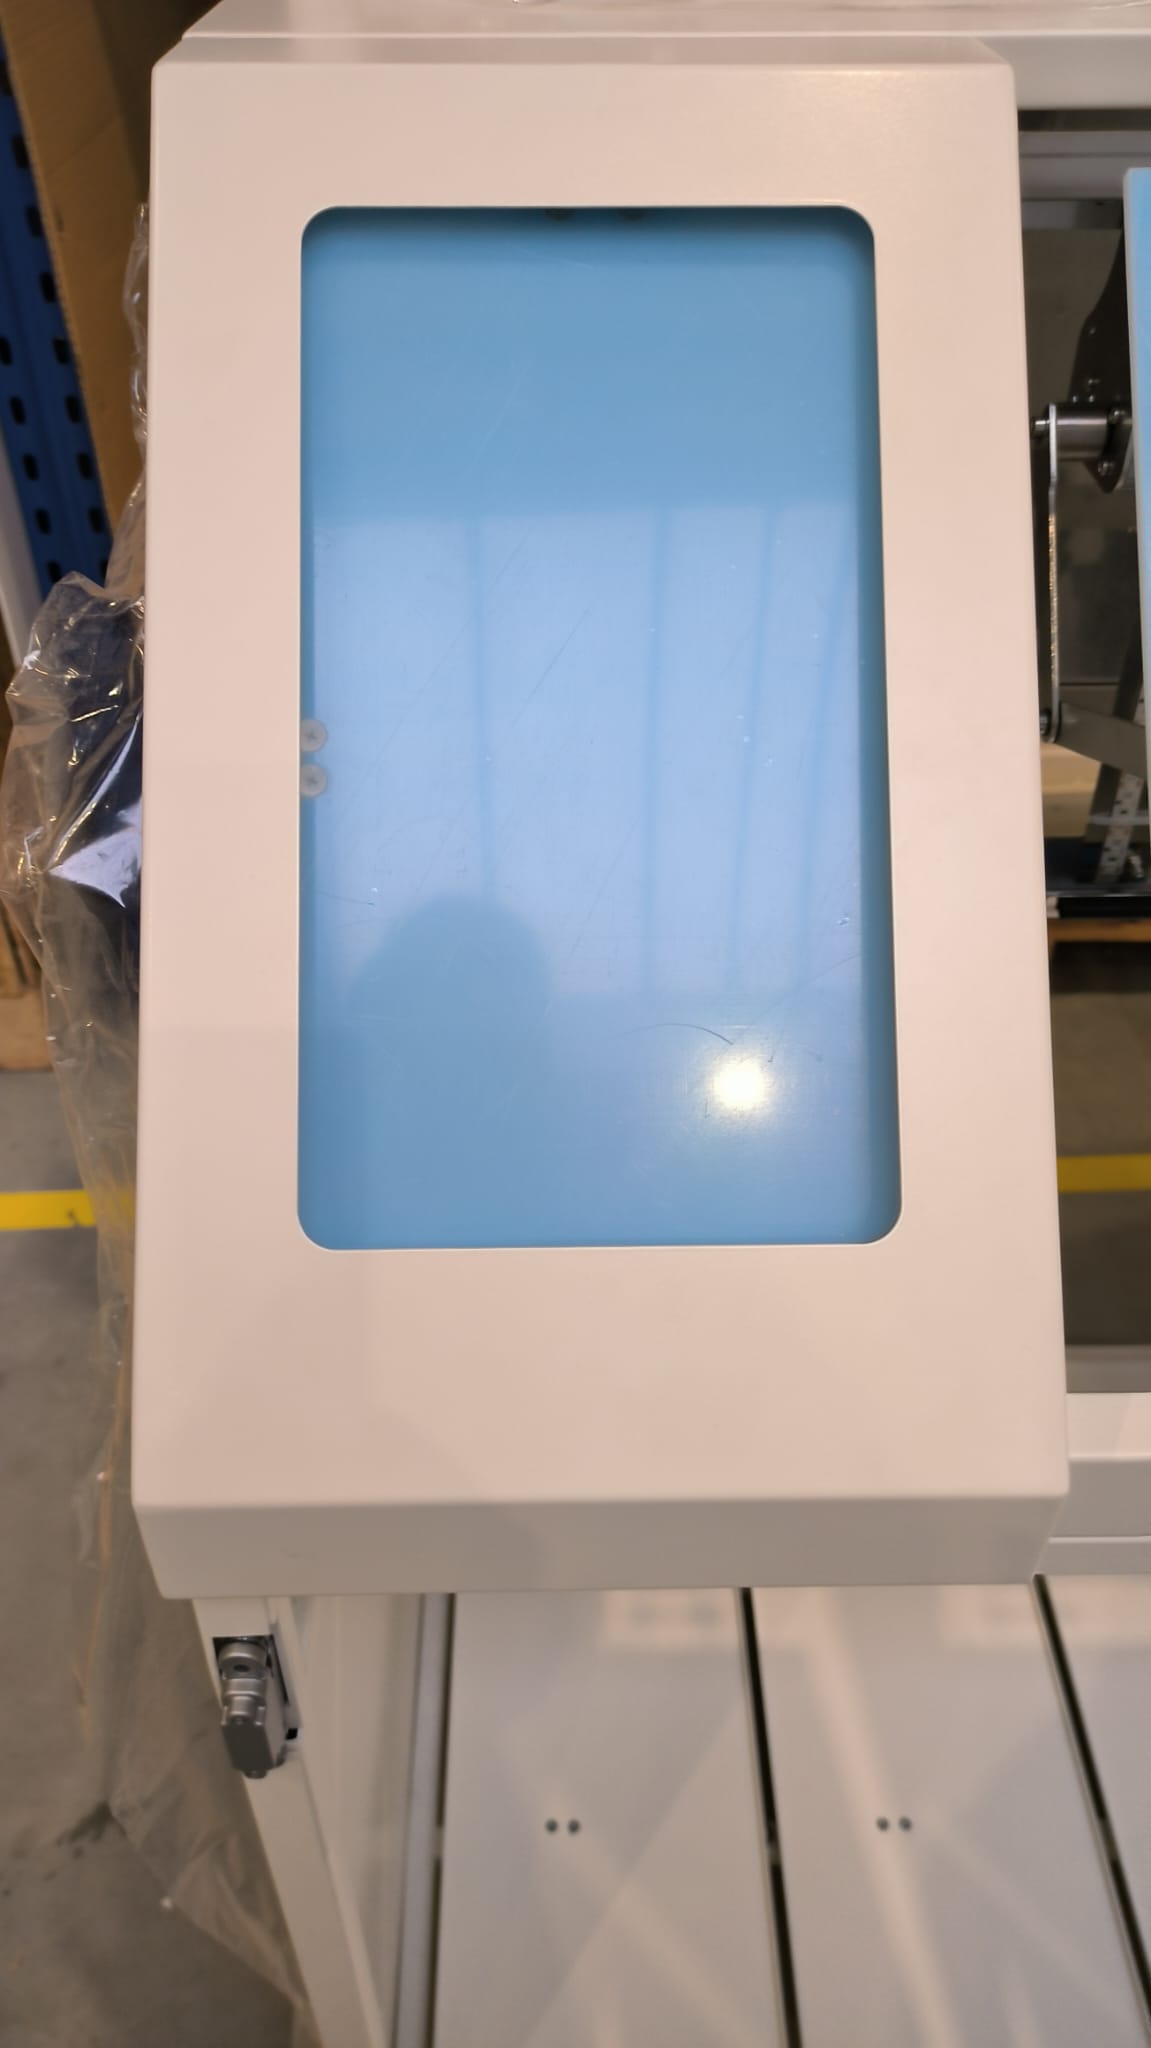
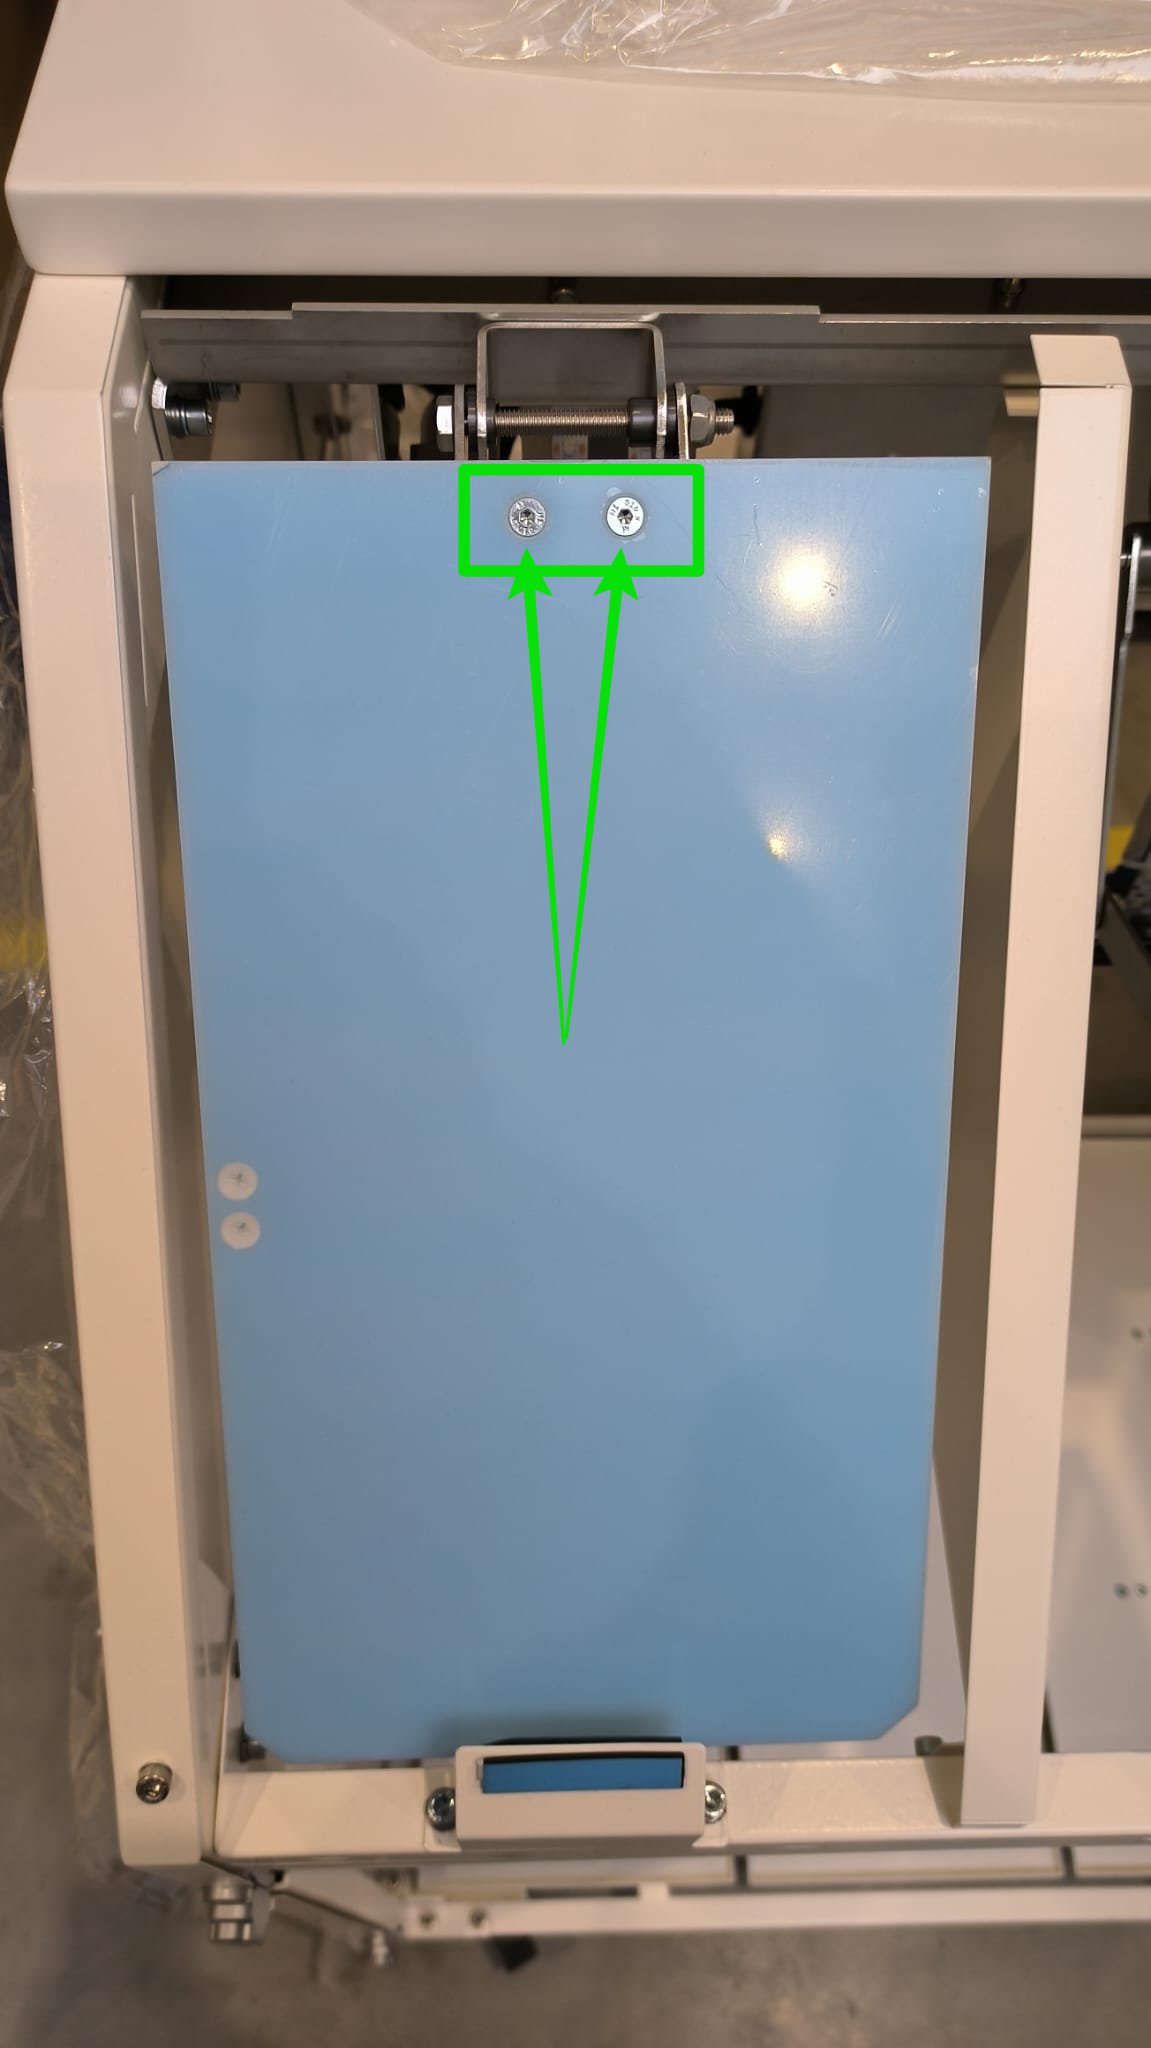
#### **Step 1** Remove metal cover with shape 

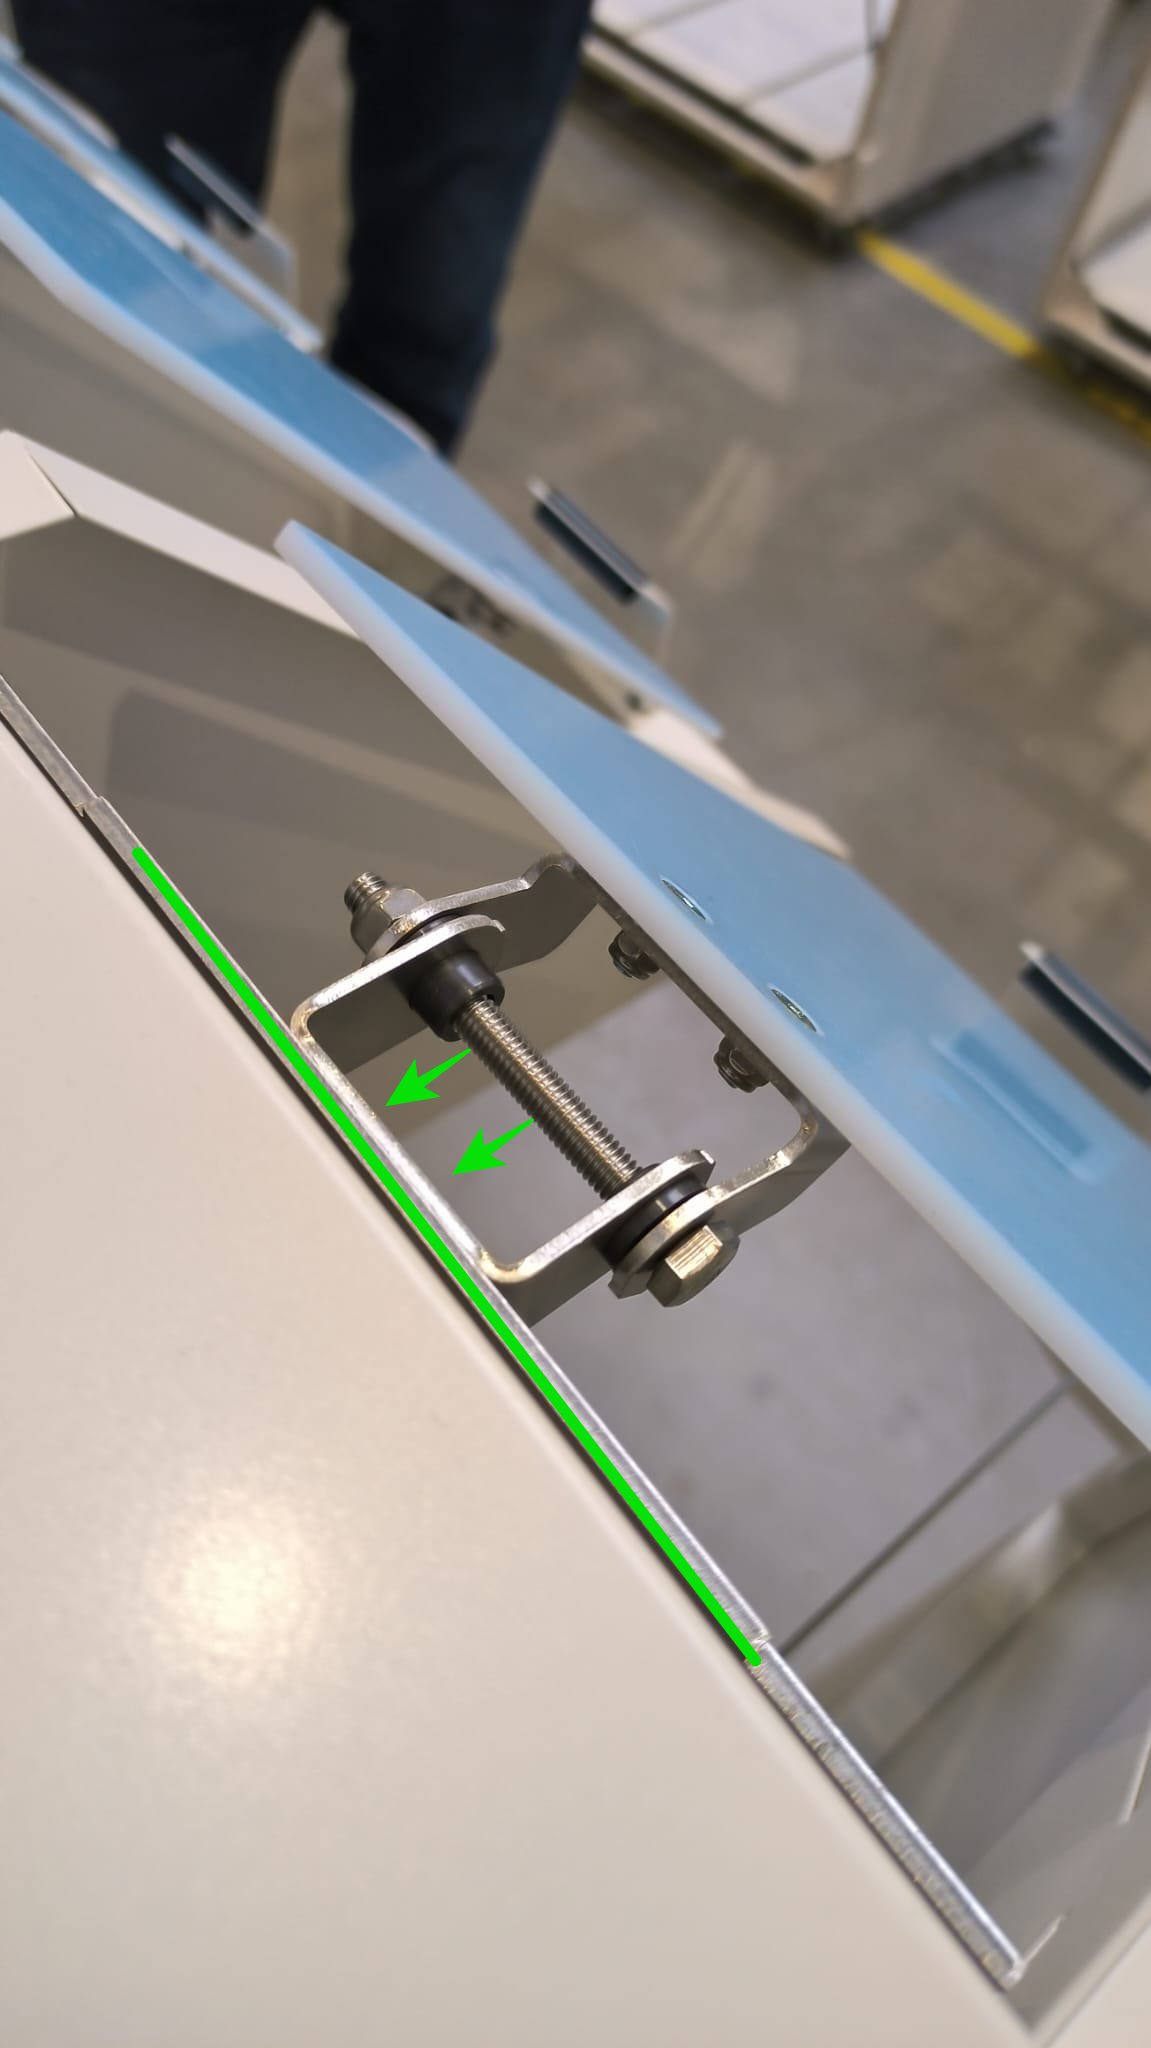
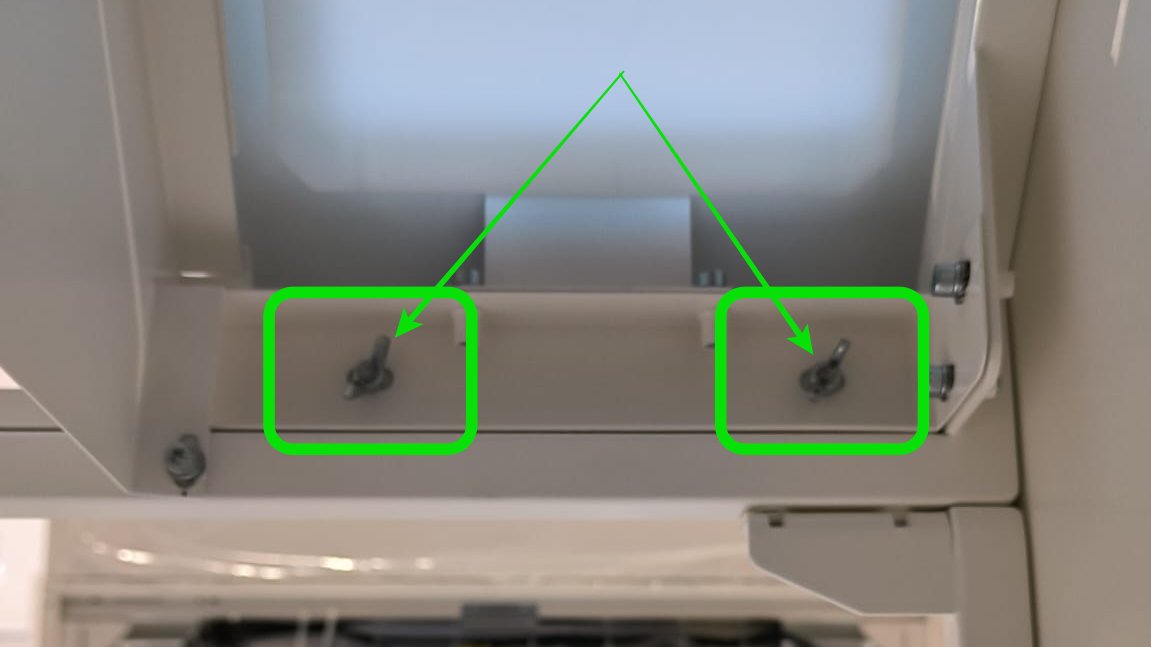
<table border="1" id="bkmrk-the-top-floor-is-bol" style="border-collapse: collapse; width: 100%; border-width: 1px; border-style: hidden;"><colgroup><col style="width: 50%;"></col><col style="width: 50%;"></col></colgroup><tbody><tr><td>- Open door
- Unscrew metal cover

</td><td>[![WhatsApp Image 2024-01-25 at 09.55.48.jpeg](https://docs.bine.world/uploads/images/gallery/2024-01/scaled-1680-/wEMLORwEwFn5f1JH-whatsapp-image-2024-01-25-at-09-55-48.jpeg)](https://docs.bine.world/uploads/images/gallery/2024-01/wEMLORwEwFn5f1JH-whatsapp-image-2024-01-25-at-09-55-48.jpeg)[![WhatsApp Image 2024-01-25 at 09.56.02.jpeg](https://docs.bine.world/uploads/images/gallery/2024-01/scaled-1680-/c5ZrlL7xve5Jvc62-whatsapp-image-2024-01-25-at-09-56-02.jpeg)](https://docs.bine.world/uploads/images/gallery/2024-01/c5ZrlL7xve5Jvc62-whatsapp-image-2024-01-25-at-09-56-02.jpeg)</td></tr></tbody></table>

---

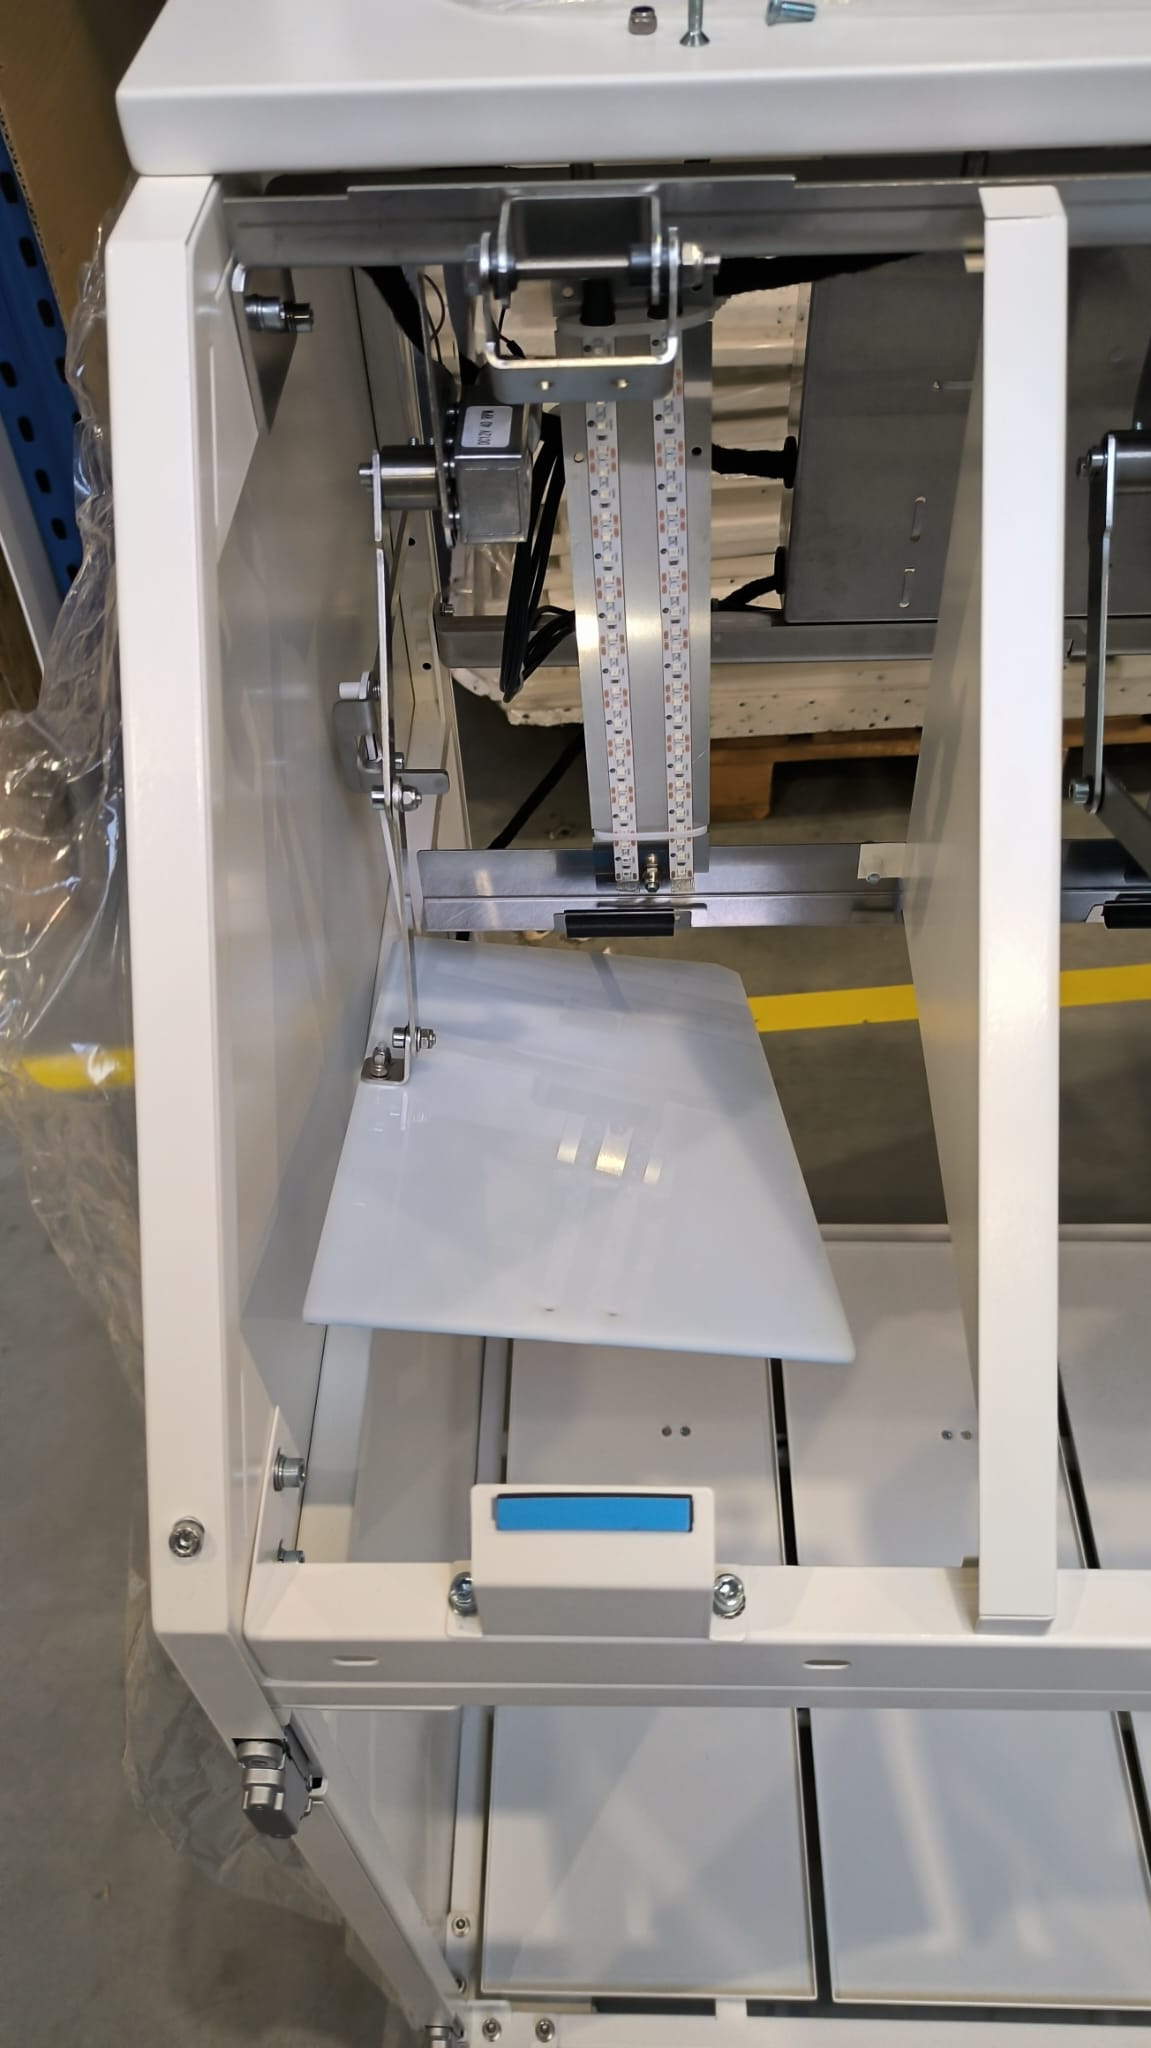
#### **Step 2** Unscrew plastic flaps (optional)

<table border="1" id="bkmrk-unplug-the-sensor" style="border-collapse: collapse; width: 100%; border-width: 1px; border-style: hidden;"><colgroup><col style="width: 50%;"></col><col style="width: 50%;"></col></colgroup><tbody><tr><td>- this is just to have easier access to the motor plug and screw. Is not always necessary
- <span style="color: rgb(53, 152, 219);">**Depending on the hardware version, may be blind rivet nuts or a separate nut**</span>

</td><td>[![WhatsApp Image 2024-01-25 at 10.41.45.jpeg](https://docs.bine.world/uploads/images/gallery/2024-01/scaled-1680-/9BedsVxDQoOdH130-whatsapp-image-2024-01-25-at-10-41-45.jpeg)](https://docs.bine.world/uploads/images/gallery/2024-01/9BedsVxDQoOdH130-whatsapp-image-2024-01-25-at-10-41-45.jpeg)![WhatsApp Image 2024-01-25 at 09.56.26.jpeg](https://docs.bine.world/uploads/images/gallery/2024-01/scaled-1680-/CzLxzWZ2M5dzywct-whatsapp-image-2024-01-25-at-09-56-26.jpeg)</td></tr></tbody></table>
---

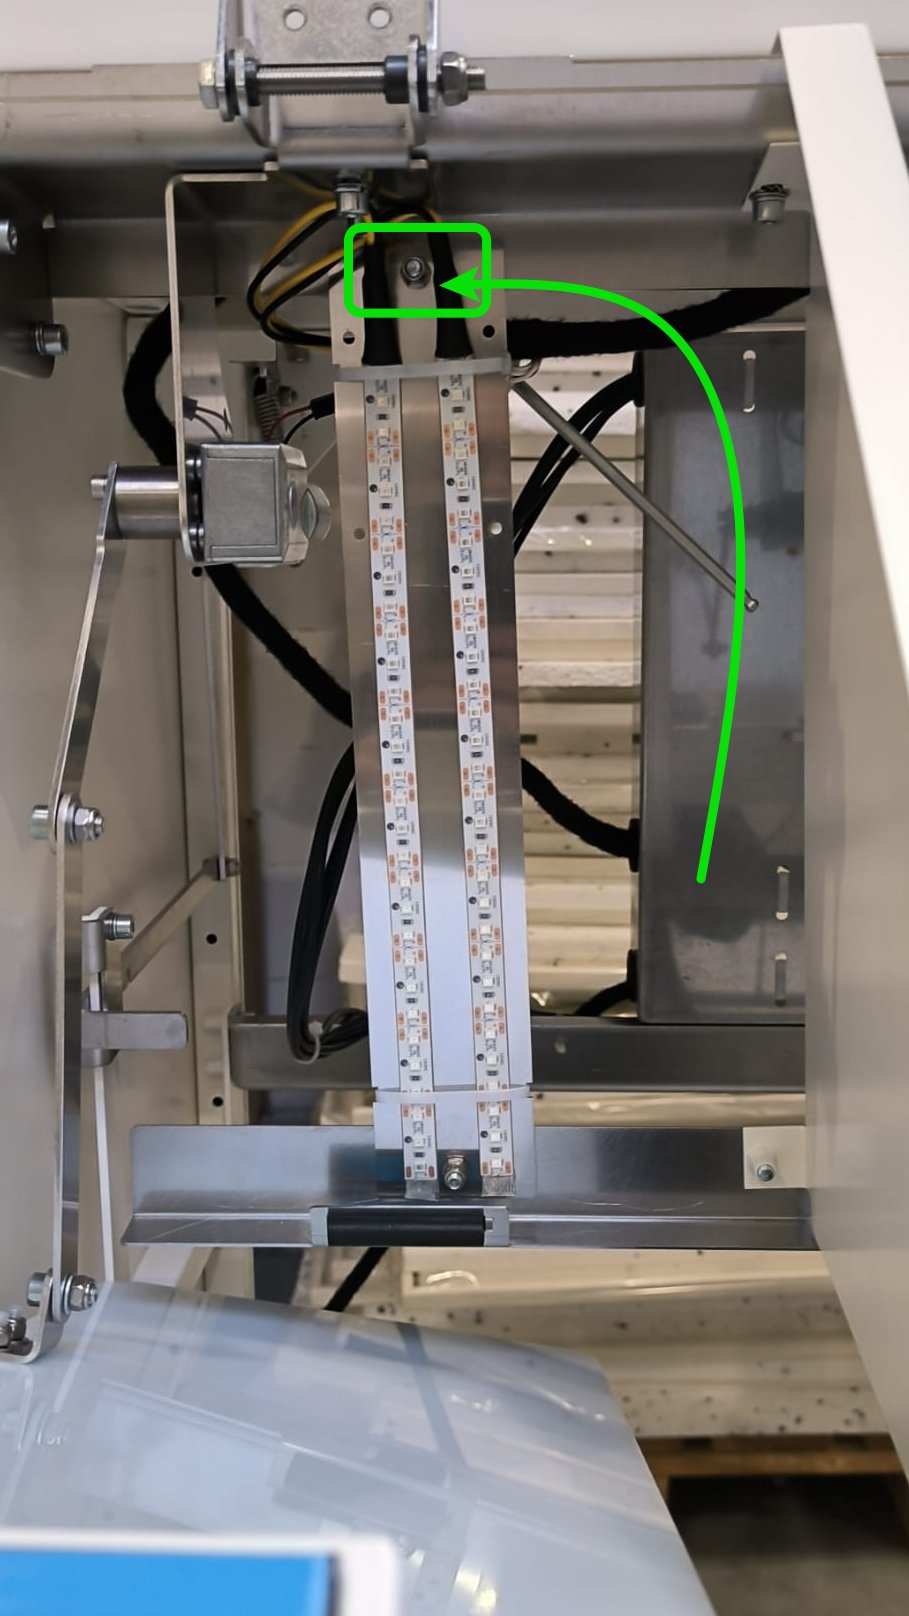
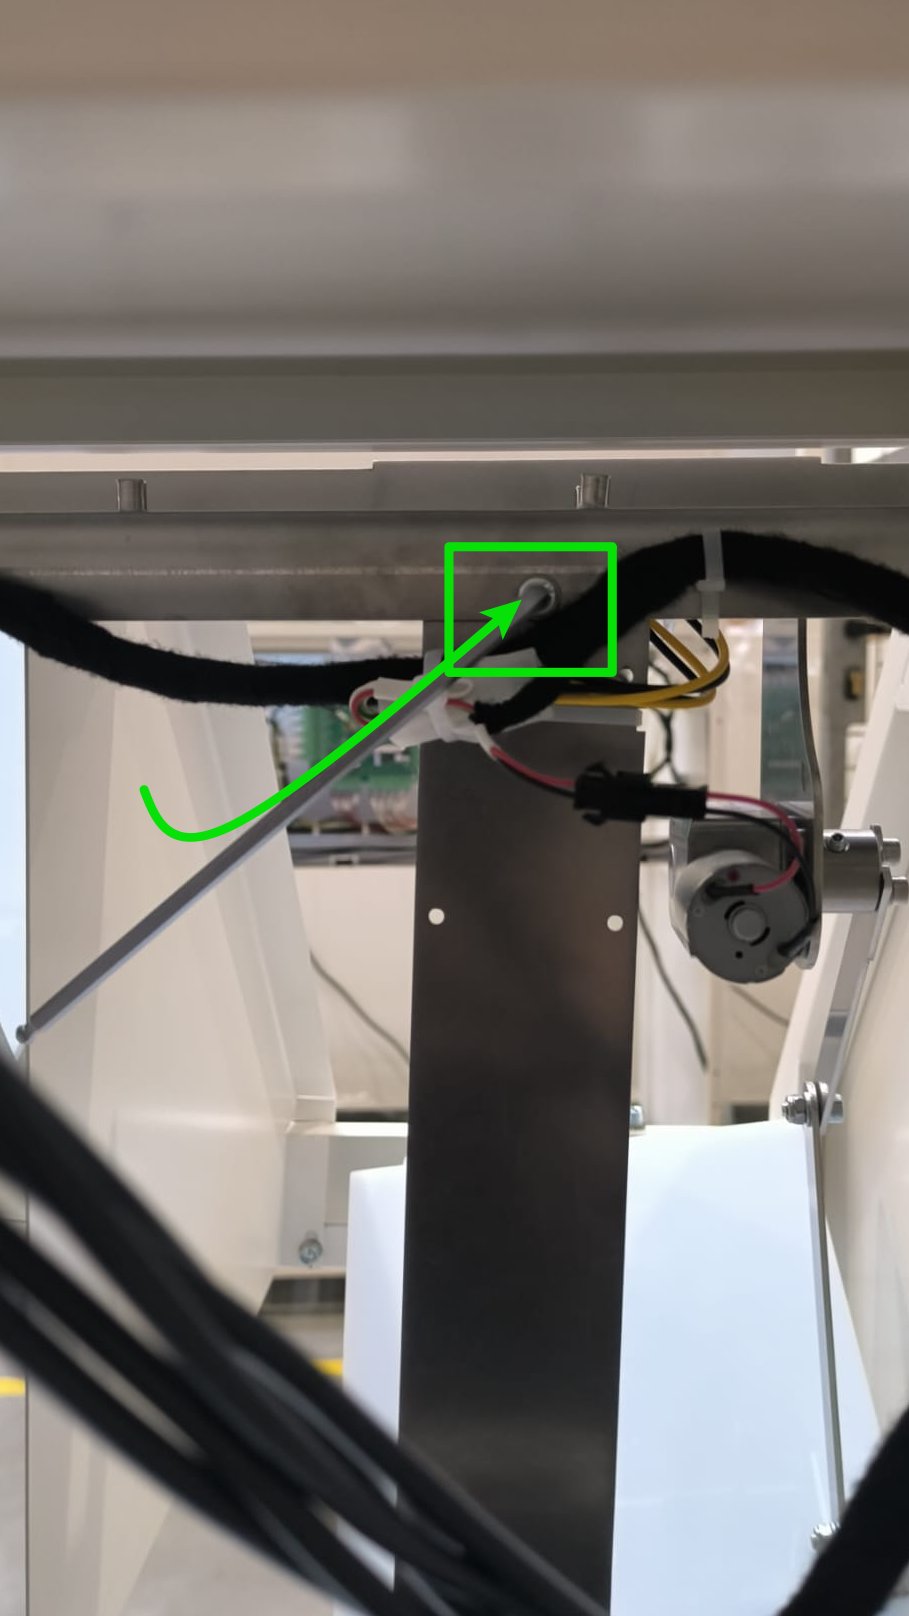
#### **Step 3** Unscrew led holder (optional)

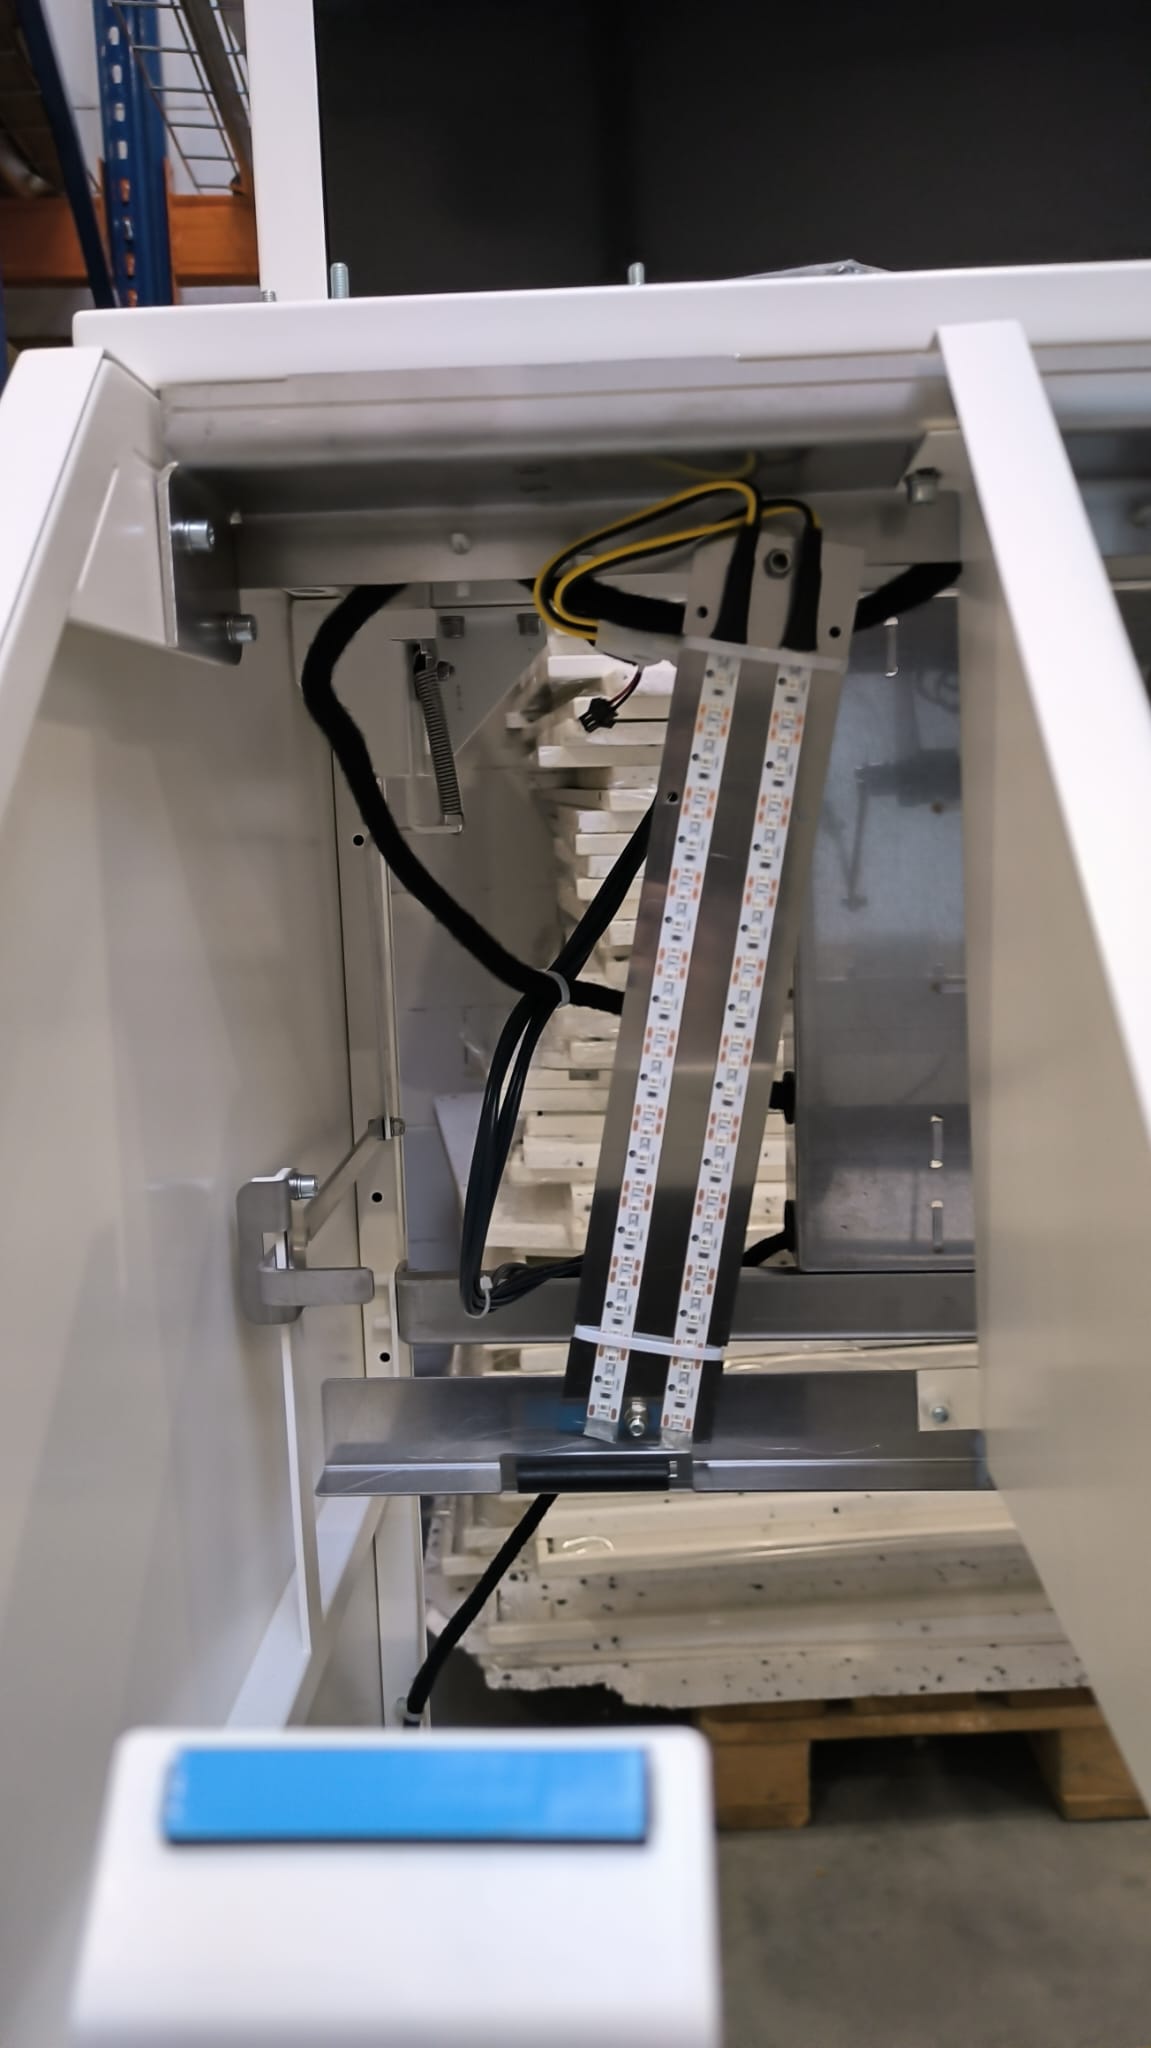
<table border="1" id="bkmrk--2" style="border-collapse: collapse; width: 100%; border-width: 1px; border-style: hidden;"><colgroup><col style="width: 50%;"></col><col style="width: 50%;"></col></colgroup><tbody><tr><td>- this is just to have easier access to the motor plug and screw. Is not always necessary
- <span style="color: rgb(53, 152, 219);">**Depending on the hardware version, the bolt may be from the front or rear**</span>

</td><td>[![WhatsApp Image 2024-01-25 at 09.56.52.jpeg](https://docs.bine.world/uploads/images/gallery/2024-01/scaled-1680-/efqAuNxn2bp39d7o-whatsapp-image-2024-01-25-at-09-56-52.jpeg)](https://docs.bine.world/uploads/images/gallery/2024-01/efqAuNxn2bp39d7o-whatsapp-image-2024-01-25-at-09-56-52.jpeg)</td></tr><tr><td>  
</td><td>[![WhatsApp Image 2024-01-25 at 11.05.23.jpeg](https://docs.bine.world/uploads/images/gallery/2024-01/scaled-1680-/DHwY7SQSuhwQ7w2z-whatsapp-image-2024-01-25-at-11-05-23.jpeg)](https://docs.bine.world/uploads/images/gallery/2024-01/DHwY7SQSuhwQ7w2z-whatsapp-image-2024-01-25-at-11-05-23.jpeg)  
</td></tr></tbody></table>

---

#### **Step 4** Unplug motor cable

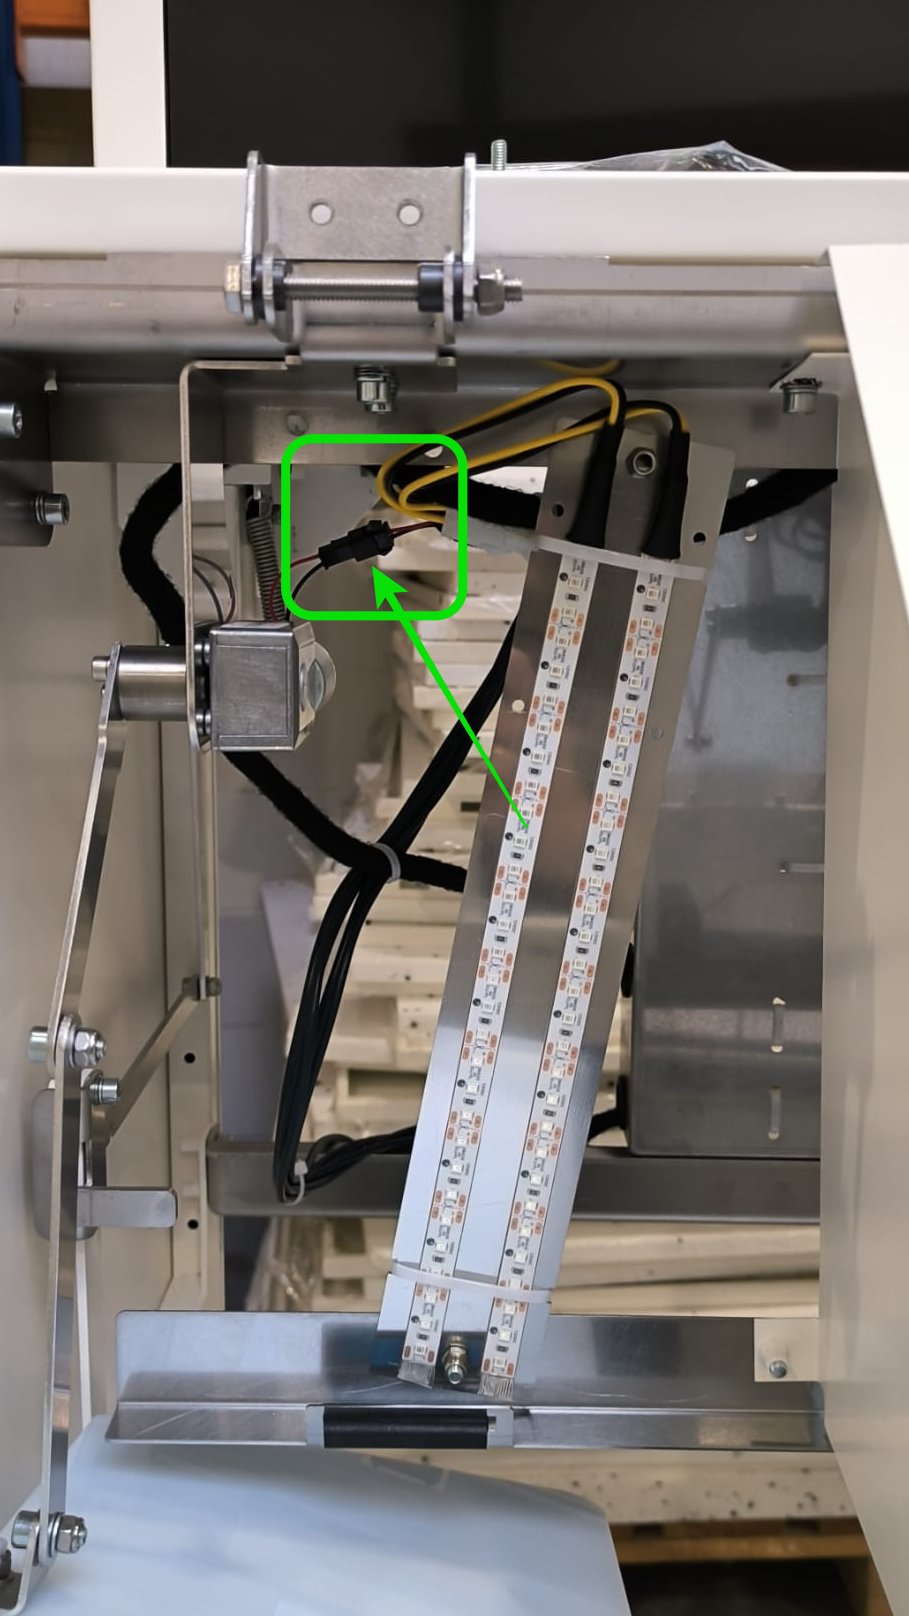
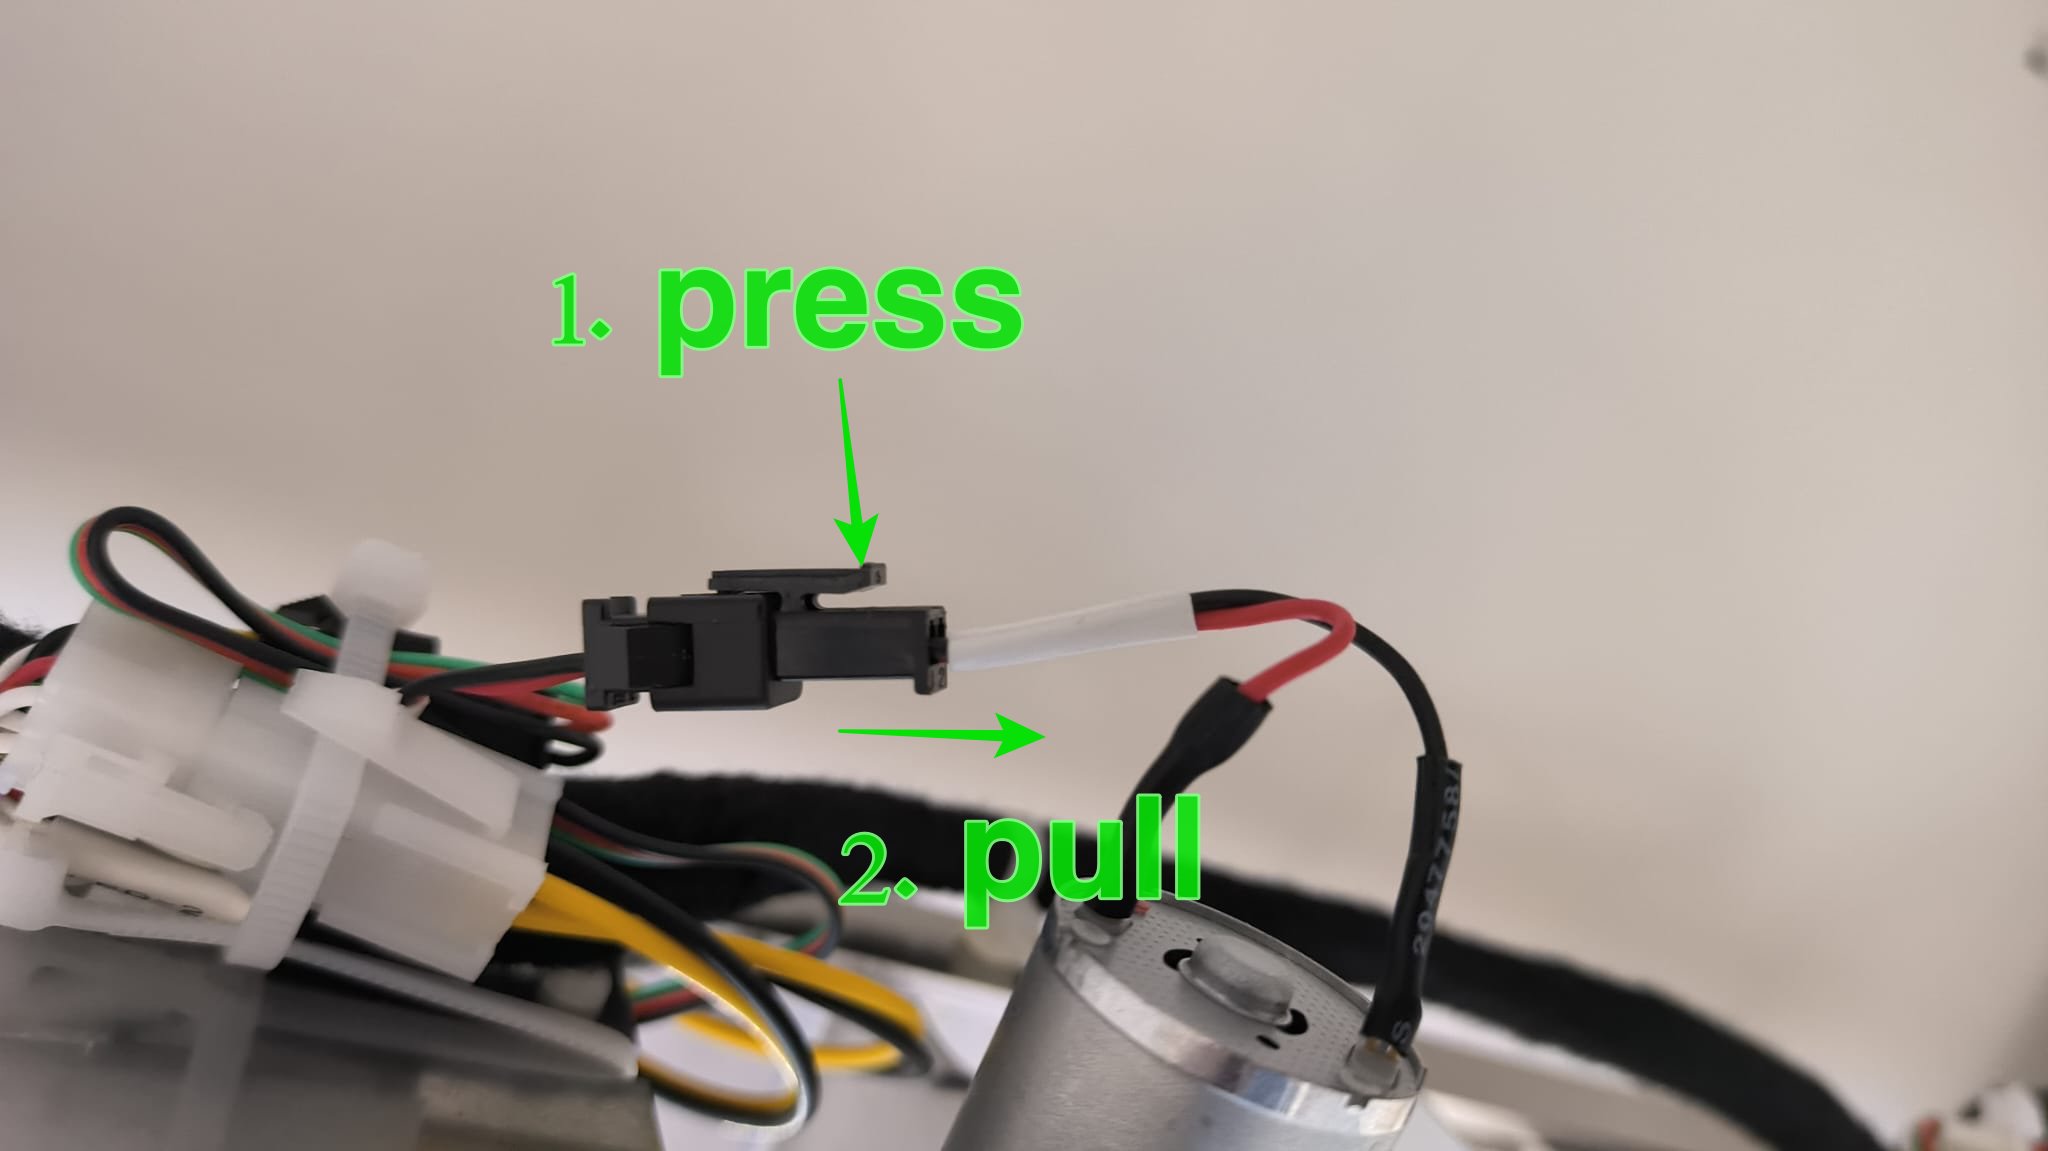
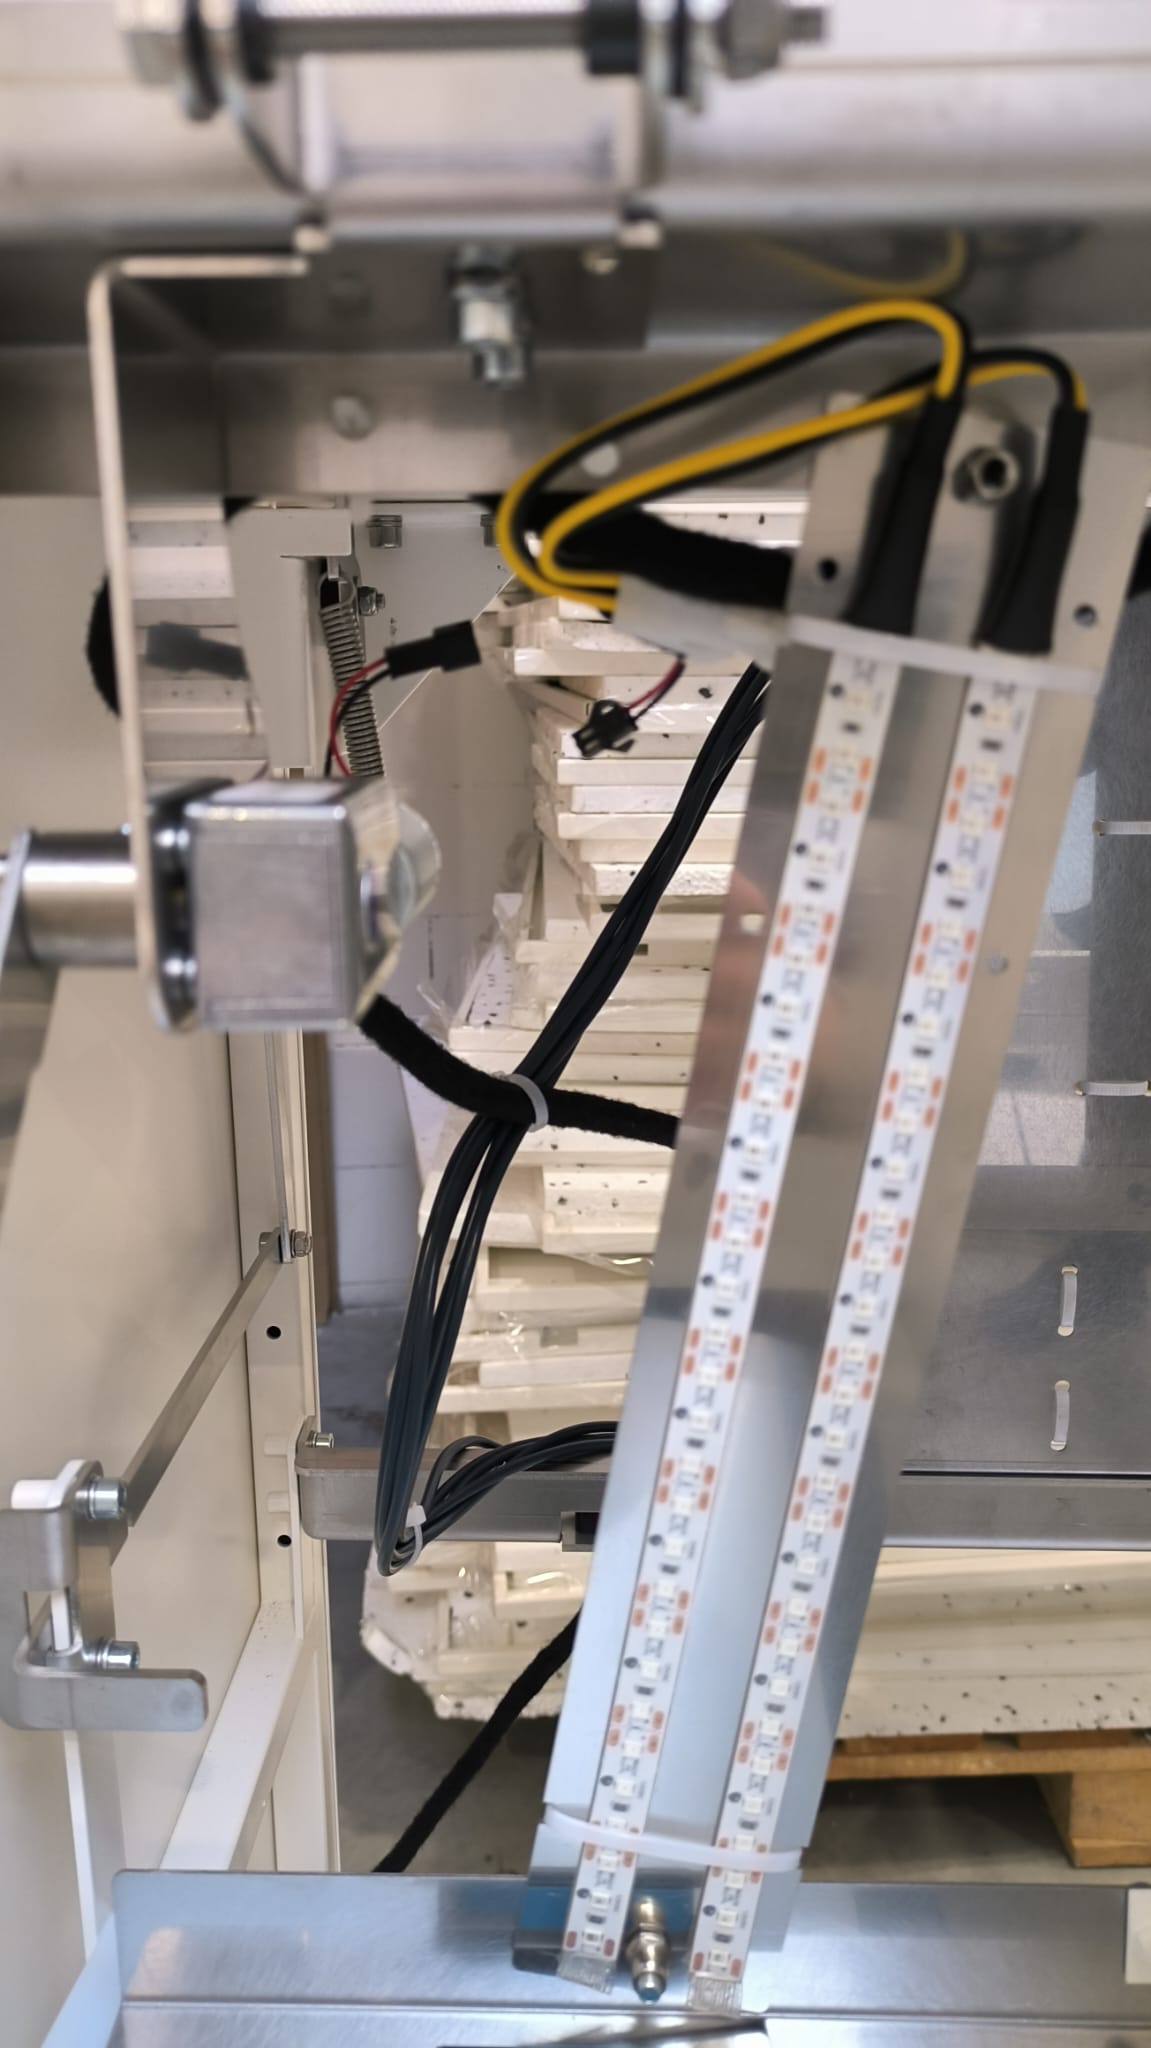
<table border="1" id="bkmrk--8" style="border-collapse: collapse; width: 100%; border-width: 1px; border-style: hidden;"><colgroup><col style="width: 50%;"></col><col style="width: 50%;"></col></colgroup><tbody><tr><td style="border-width: 1px;">- there is only one two-pin plug with a red and black cable

</td><td style="border-width: 1px;">[![WhatsApp Image 2024-01-25 at 09.57.04.jpeg](https://docs.bine.world/uploads/images/gallery/2024-01/scaled-1680-/wasFKjvBVNhyFzH4-whatsapp-image-2024-01-25-at-09-57-04.jpeg)](https://docs.bine.world/uploads/images/gallery/2024-01/wasFKjvBVNhyFzH4-whatsapp-image-2024-01-25-at-09-57-04.jpeg)</td></tr><tr><td style="border-width: 1px;"><p class="callout warning">Never pull the cables, only the plastic connector!</p>

</td><td style="border-width: 1px;">[![WhatsApp Image 2024-01-25 at 10.03.45 (2).jpeg](https://docs.bine.world/uploads/images/gallery/2024-01/1I8Nr7owi3qwO82A-whatsapp-image-2024-01-25-at-10-03-45-2.jpeg)](https://docs.bine.world/uploads/images/gallery/2024-01/1I8Nr7owi3qwO82A-whatsapp-image-2024-01-25-at-10-03-45-2.jpeg)

</td></tr><tr><td style="border-width: 1px;"></td><td style="border-width: 1px;">[![WhatsApp Image 2024-01-25 at 09.57.33.jpeg](https://docs.bine.world/uploads/images/gallery/2024-01/scaled-1680-/LihvrbbPfP6qn4xy-whatsapp-image-2024-01-25-at-09-57-33.jpeg)](https://docs.bine.world/uploads/images/gallery/2024-01/LihvrbbPfP6qn4xy-whatsapp-image-2024-01-25-at-09-57-33.jpeg)

</td></tr></tbody></table>

---

#### **Step 5** Unscrew motor mechanism

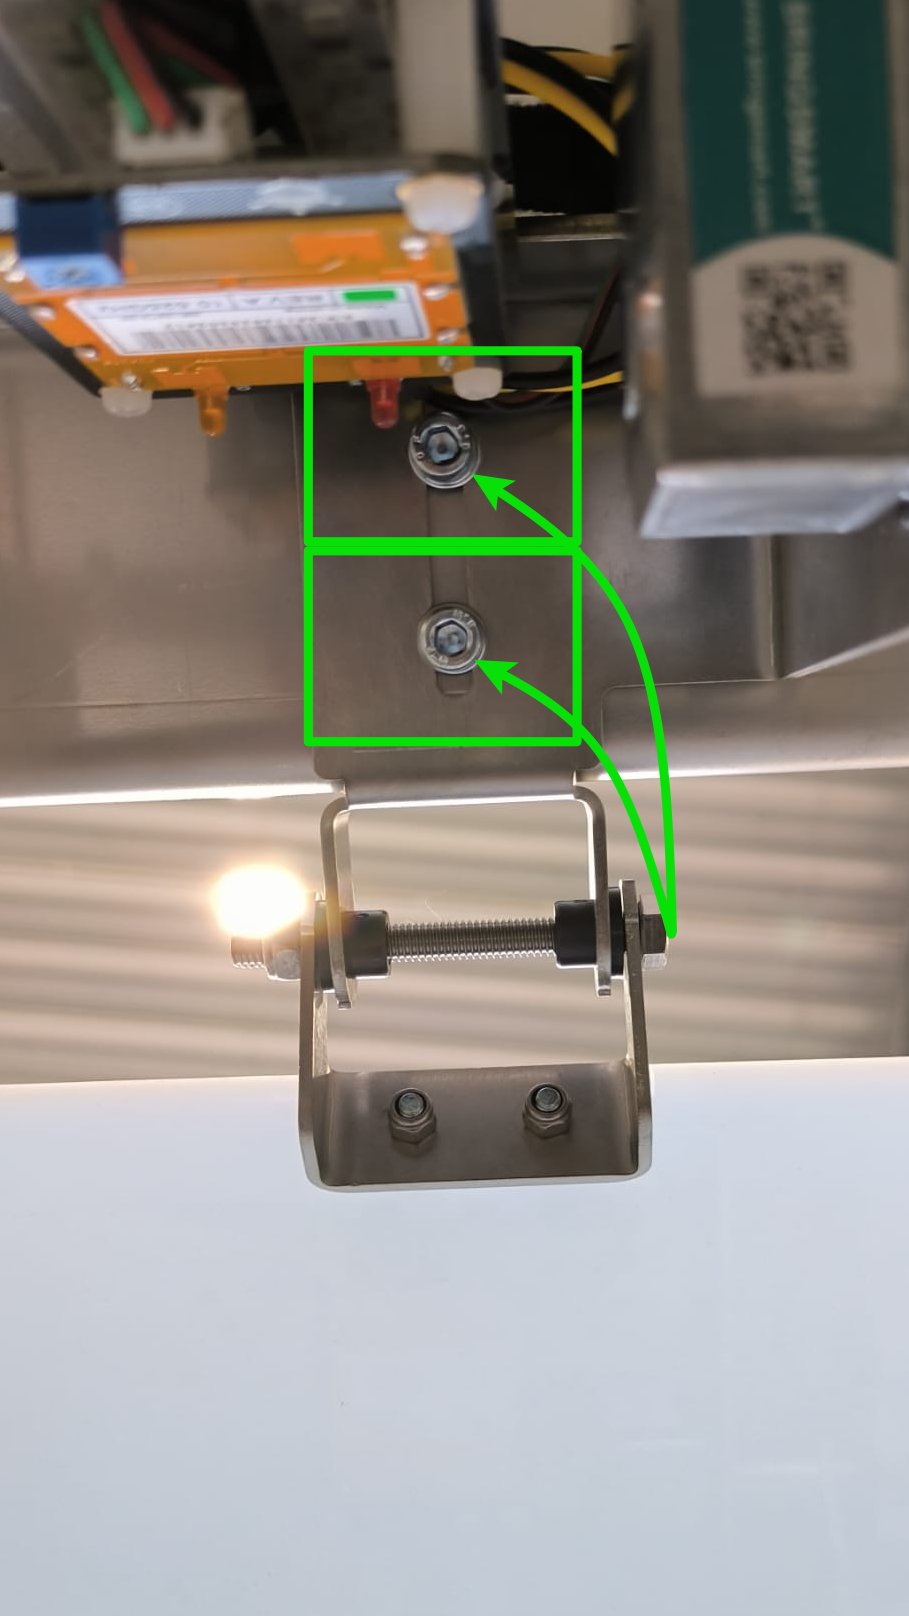
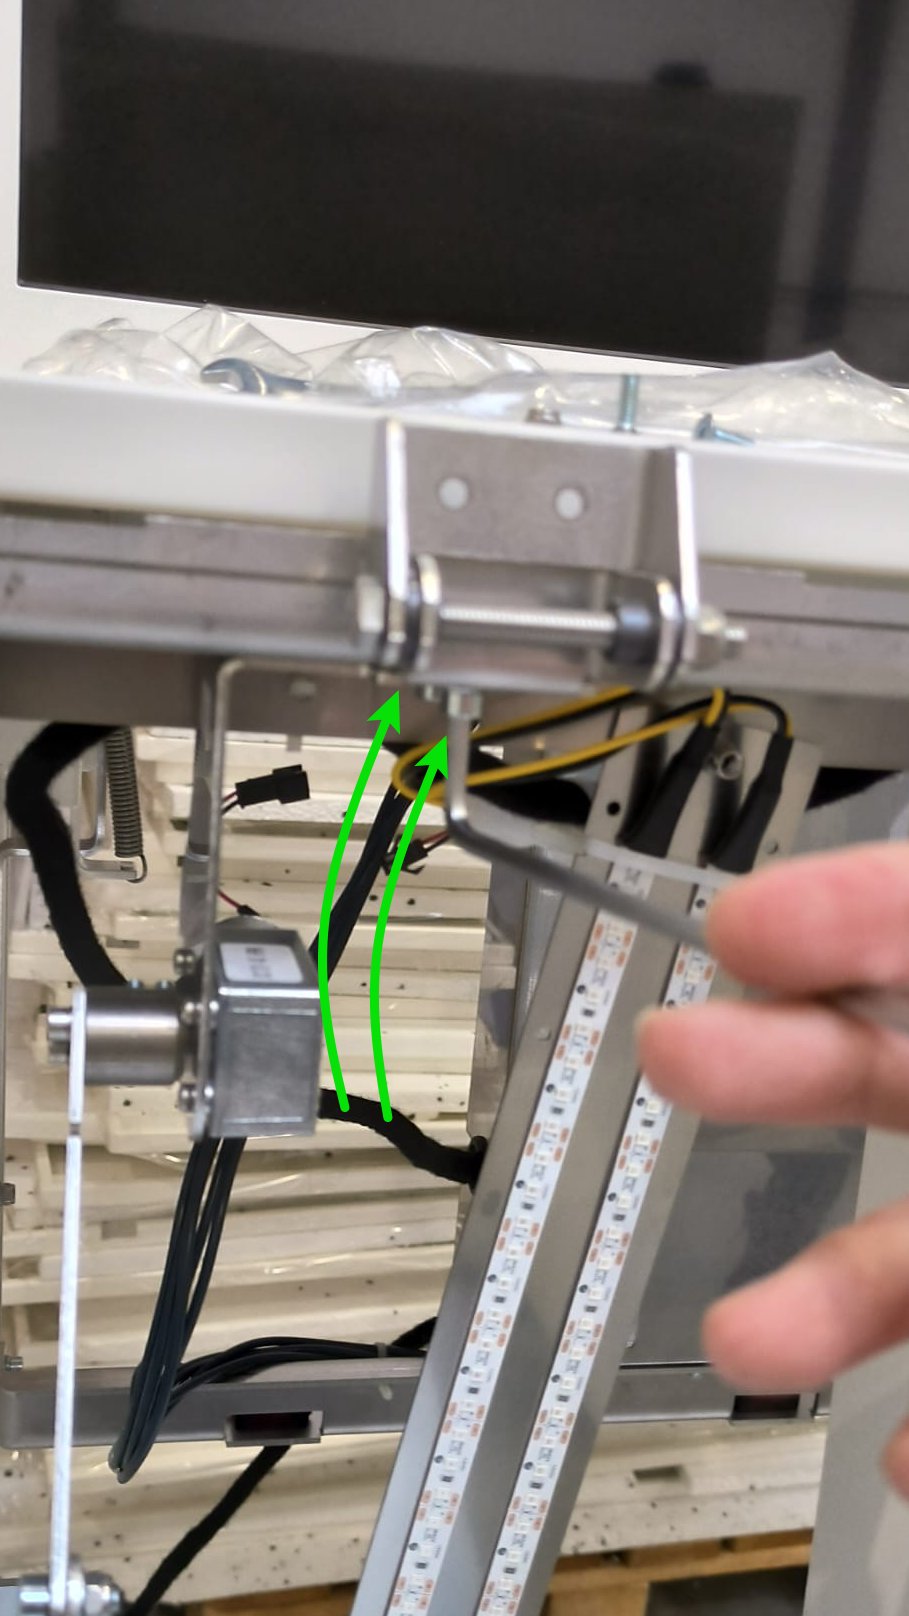
<table border="1" id="bkmrk-najpierw-u%C5%82%C3%B3%C5%BC-belki-" style="border-collapse: collapse; width: 100%; border-width: 1px; border-style: hidden; height: 839.008px;"><colgroup><col style="width: 50%;"></col><col style="width: 50%;"></col></colgroup><tbody><tr style="height: 416.555px;"><td style="height: 416.555px;">- there are two Allen screws holding the entire mechanism

</td><td style="height: 416.555px;">[![WhatsApp Image 2024-01-25 at 10.03.46.jpeg](https://docs.bine.world/uploads/images/gallery/2024-01/scaled-1680-/Qzt9pbdOZTh53gqp-whatsapp-image-2024-01-25-at-10-03-46.jpeg)](https://docs.bine.world/uploads/images/gallery/2024-01/Qzt9pbdOZTh53gqp-whatsapp-image-2024-01-25-at-10-03-46.jpeg)</td></tr><tr style="height: 422.453px;"><td style="height: 422.453px;">  
</td><td style="height: 422.453px;">[![WhatsApp Image 2024-01-25 at 09.58.00.jpeg](https://docs.bine.world/uploads/images/gallery/2024-01/scaled-1680-/XZeuyrJmxDszB5jl-whatsapp-image-2024-01-25-at-09-58-00.jpeg)](https://docs.bine.world/uploads/images/gallery/2024-01/XZeuyrJmxDszB5jl-whatsapp-image-2024-01-25-at-09-58-00.jpeg)</td></tr></tbody></table>

---

#### **Step 6** Now you can replace with new mechanism and assembly with opposite direction of the points

<table border="1" id="bkmrk-asdasd" style="border-collapse: collapse; width: 100%; border-width: 1px; border-style: hidden;"><colgroup><col style="width: 50%;"></col><col style="width: 50%;"></col></colgroup><tbody><tr><td></td><td>[![WhatsApp Image 2024-01-25 at 09.58.25.jpeg](https://docs.bine.world/uploads/images/gallery/2024-01/scaled-1680-/pGZ7gKHw5S5j7JnV-whatsapp-image-2024-01-25-at-09-58-25.jpeg)](https://docs.bine.world/uploads/images/gallery/2024-01/pGZ7gKHw5S5j7JnV-whatsapp-image-2024-01-25-at-09-58-25.jpeg)</td></tr><tr><td>- <span style="color: rgb(53, 152, 219);">**when installing the new mechanism, make sure that the parts fit together as in the photo**</span>

</td><td>[![WhatsApp Image 2024-01-25 at 09.56.13.jpeg](https://docs.bine.world/uploads/images/gallery/2024-01/scaled-1680-/dJ04YF4RzECGTTbK-whatsapp-image-2024-01-25-at-09-56-13.jpeg)](https://docs.bine.world/uploads/images/gallery/2024-01/dJ04YF4RzECGTTbK-whatsapp-image-2024-01-25-at-09-56-13.jpeg)</td></tr></tbody></table>

#### Checklist after replace:

- [ ] no screws remain
- [ ] motor work properly on full range in proper direction
- [ ] LEDs works OK
- [ ] person detect system works OK (on bin 2 and 4)